4.8.1 Custom Device Integration
Custom device integration is used to bring security devices that are not preset into the Device Integration page. Its goal is not just to generate a normal API tool, but to generate a device plugin that the device page can recognize, configure, enable or disable by instance, and test.
Suitable targets include NDR, WAF, firewalls, HIDS, EDR, situational awareness platforms, asset platforms, alert platforms, bastion hosts, and internal enterprise systems that only provide private interfaces or Web consoles.
1. Integration Entry Point
After entering Device Integration, select Add Device, then choose Custom Device in the vendor selection. Custom devices primarily support three integration paths: API, WebCLI, and Workflow integration.
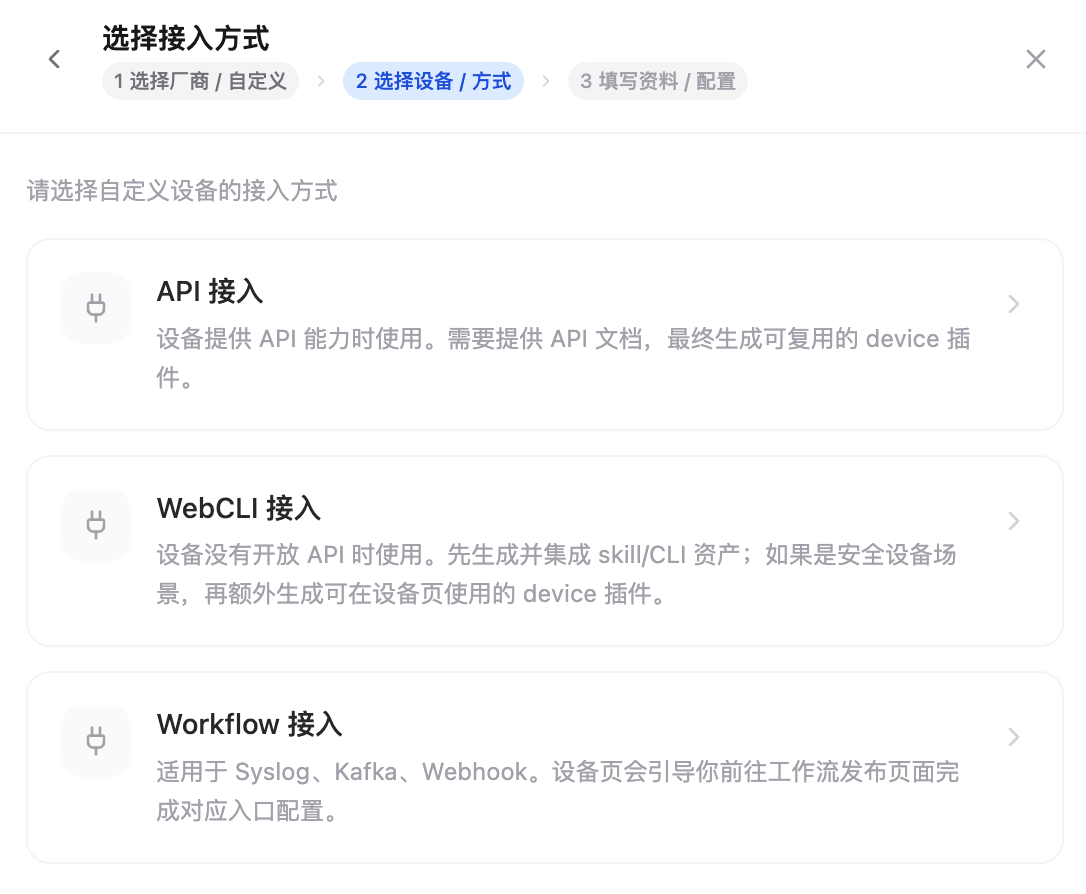
| Integration Method | Applicable Scenario | Generated Result |
|---|---|---|
| API Integration | The device provides an official API, private API, OpenAPI document, or HTTP interfaces that can be organized. | Rex leverages tool-builder to generate a reusable device plugin. |
| WebCLI Integration | The device has no open API, or key capabilities can only be completed from the Web console. | Rex uses web2cli to capture page behavior and hidden interfaces, then generates a WebCLI device plugin as needed. |
| Workflow Integration | Device data is continuously pushed through Syslog, Kafka, Webhook, or similar inputs. | Go to the Workflow publishing / integration page to configure the input source and connect the device event stream to the specified Workflow. |
If the device supports Syslog, Kafka, or Webhook push, use Workflow Integration instead. Connect this type of event stream to the publishing / integration entry point of Workflow instead of creating a device plugin here. You can open any Workflow on the Workflow page and enter Publish / Integrate to view and configure the corresponding entry point.
2. API Integration Process
API integration is suitable for scheduled execution, recurring tasks, batch queries, and scenarios that require stable audit records. You need to provide Rex with API documentation or interface descriptions. Rex will first clarify missing information, then generate a device plugin that the device page can recognize.
2.1 Provide Interface Materials
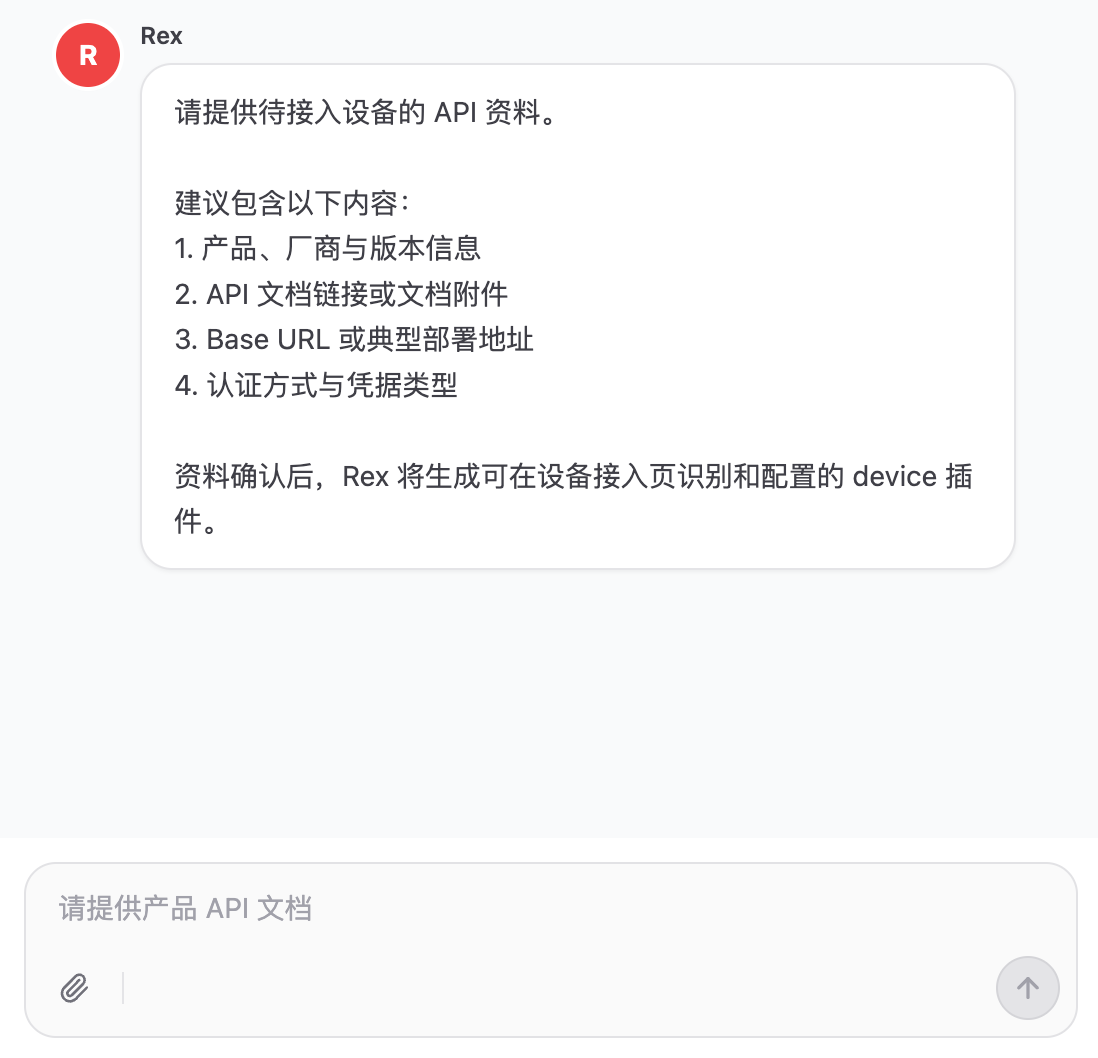
Prepare at least:
- Product details, including vendor name and version.
- API documentation links, OpenAPI files, PDF/Word documents, or interface examples.
- Base URL or typical deployment address.
- Authentication method and credential types, such as API Key, Token, AK/SK, username and password, or signature rules.
- Desired capability scope. If you only need some interfaces, specify the interface names or paths.
2.2 Configure the Device Instance
After the plugin is generated, return to the device integration page, refresh the templates, select the newly generated device template, and enter the instance configuration. The configuration form comes from credential_fields in the plugin _provider.yaml, so different devices show different fields.
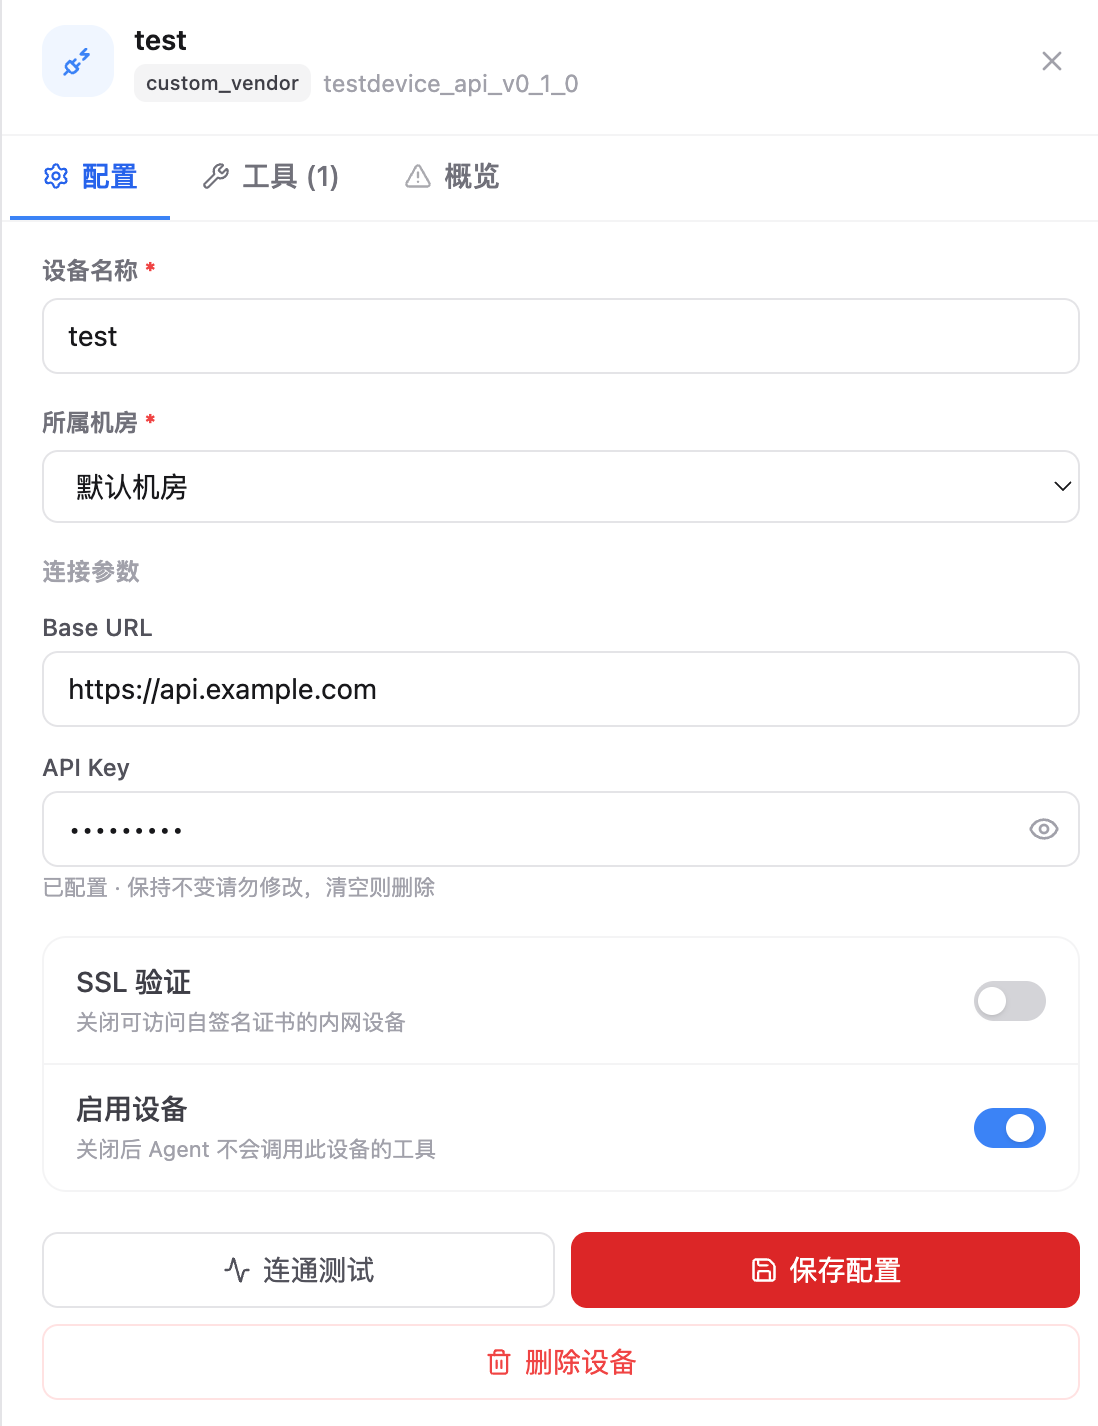
Common fields:
- Device Name: Current instance name, such as Headquarters WAF or Shanghai NDR.
- Data Center: Data center group that the device instance belongs to.
- Base URL: Root address of the device API.
- API Key / Token / Secret: Authentication credentials. Secret fields are saved as secrets, and when edited, they usually only show that they are configured.
- SSL Verification: Can be disabled when an internal device uses a self-signed certificate.
- Enable Device: When disabled, Agent will not call tools for this device.
- Connectivity Test: Starts a test for the current device instance and writes success, failure, and latency back to the device status.
3. WebCLI Integration Process
WebCLI integration is suitable for devices without stable APIs, with insufficient API coverage, or where queries and operations must be completed through a Web console. It does not use browser click flows as the primary recurring execution path. Instead, it first captures stable interfaces from page behavior and browser requests, then wraps them as a device plugin.
3.1 Provide Page Materials
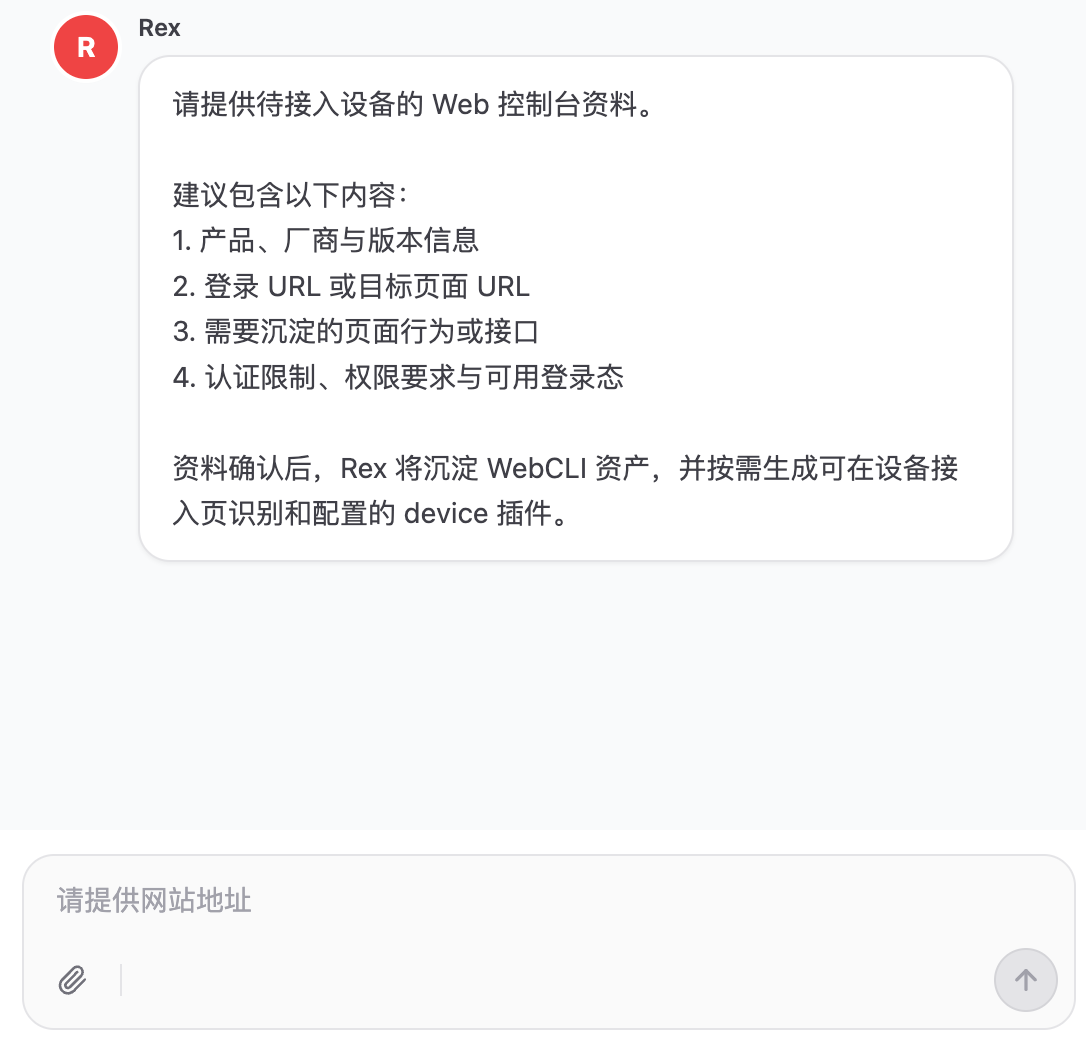
Prepare at least:
- Product details, including vendor name and version.
- Login URL or target page URL.
- Page behaviors or interfaces to capture, such as alert lists, asset details, blocking an IP, or exporting reports.
- Authentication constraints, permission requirements, and available login state.
- Whether manual QR-code scanning, CAPTCHA, bastion-host redirects, or a read-only account are required.
3.2 Configure Login State
WebCLI device plugins rely on saved cookie or authentication state (auth-state) by default: they first reuse login-state files saved by the browser, and when needed, use a username and password to help refresh the login state. Do not write Cookie, Token, or auth state JSON directly into plugin files.
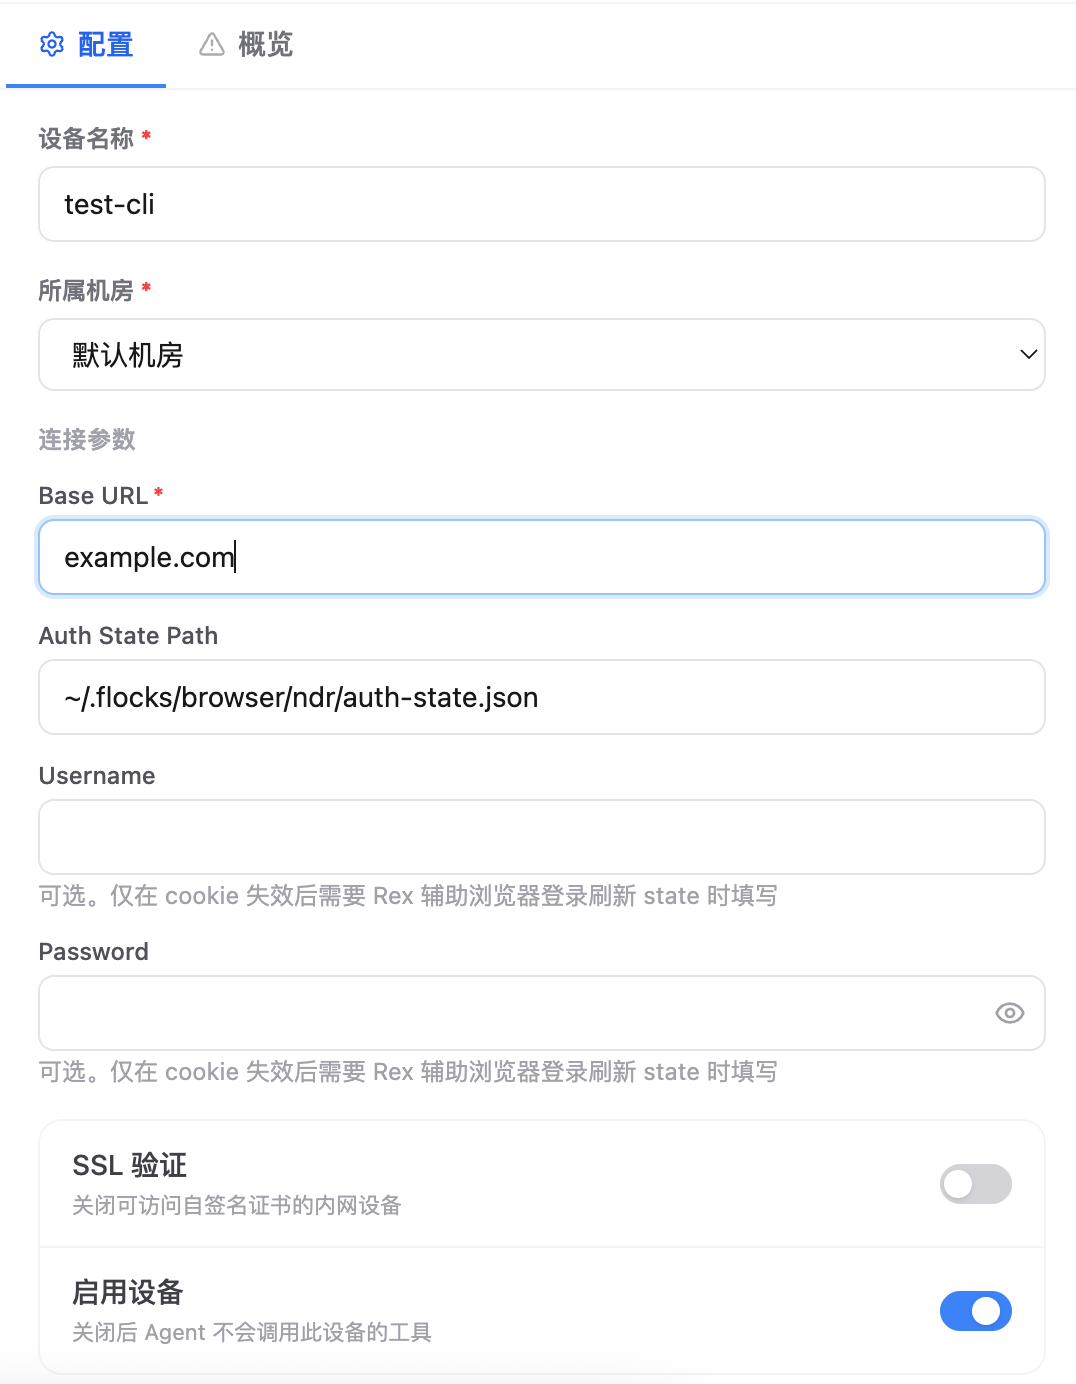
Common fields:
- Base URL: Root address of the Web console or hidden interfaces.
- Auth State Path: Path to the browser login-state file. A common format is
~/.flocks/browser/<name>/auth-state.json. - Username / Password: Optional. Usually used only after the Cookie expires and Rex needs to help the browser log in again to refresh the state.
- SSL Verification and Enable Device: Same as API integration.
The final WebCLI artifact should be a device plugin that the device page can recognize. The CLI can remain as a debugging or regression entry point, but it should not be the primary path for device runtime execution.
4. Workflow Integration Notes
Workflow integration is used to continuously receive device data. It is suitable when devices can already push logs, alerts, asset-change events, and similar data through Syslog, Kafka, or Webhook. It does not generate a device plugin. Instead, it configures the device event stream as the input source of a Workflow, and the Workflow handles parsing, triage, notification, or response.
The configuration entry point is not in the custom device plugin form. Go to the Workflow page, open any Workflow that needs to receive device data, and view or configure Syslog, Kafka, and other entry points under Publish / Integrate.
5. Device Plugin Recognition Rules
The device page does not manually maintain a custom device list. It discovers templates from plugin metadata. A custom device plugin must include at least:
~/.flocks/plugins/tools/device/<plugin_id>/
├── _provider.yaml
├── <tool>.yaml
└── <name>.handler.py
_provider.yaml must declare:
name: Custom Device
vendor: custom_vendor
service_id: custom_device
version: "1.0.0"
integration_type: device
credential_fields:
  - key: base_url
    label: Base URL
    storage: config
    input_type: url
    required: true
Key rules:
integration_type: devicedetermines whether it appears on the device integration page.service_idis the stable identifier used by tools at runtime to read configuration.versionparticipates in generating the device templatestorage_key; the page shows an identifier similar totestdevice_api_v0_1_0.credential_fieldsdetermines which fields the instance configuration form displays and which fields are saved as secrets.- The tool YAML
providermust match_provider.yaml.service_id. - High-risk write operations must require user confirmation in the tool YAML. Do not make deletion, blocking, or isolation actions default actions without confirmation.
6. Device List After Integration
After the configuration is saved, the device returns to the main list. The list shows data center, device count, connection status, template identifier, vendor, and latest test result.
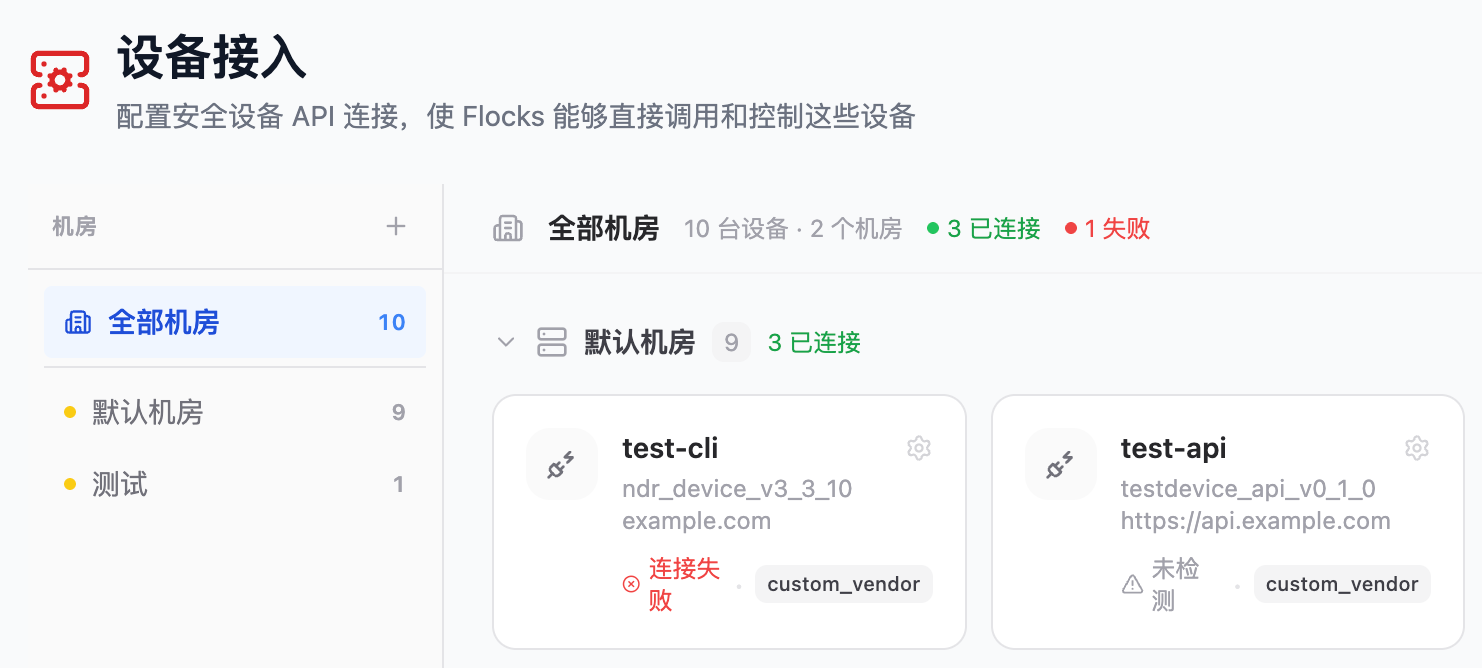
Status meanings:
- Connected: The latest connectivity test succeeded.
- Connection Failed: The latest test failed. Details usually come from the test interface response.
- Not Tested: No connectivity test has been run yet, or no instance test result has been saved after the plugin was generated.
- Disabled: After the device instance is disabled, Agent will not call tools for this device.
In device details, you can also view the Tools tab. Device tools can be enabled or disabled by individual device instance. If the same plugin integrates multiple devices, you can disable a specific tool on only one device without affecting other instances.
7. FAQ
| Question | Solution |
|---|---|
| A normal API tool was generated, but it is not visible on the device page | Confirm that the plugin is located under tools/device/<plugin_id>/ and _provider.yaml contains integration_type: device. |
| API documentation is incomplete | First have Rex clarify authentication, Base URL, interface inputs and outputs, and error codes. Integrate only confirmed interfaces. |
| WebCLI login state expired | Log in again with the browser, refresh auth-state.json, and test the device again. |
| Internal self-signed certificate causes the test to fail | Disable SSL Verification in device configuration and test again. |
| A field contains a password, Token, or Cookie | Put it in a secret field under credential_fields and let the device instance configuration save it. Do not write it into plugin code or documentation. |
8. Related Documents
- Device Management: view the main device management page.
- Tool Inventory: maintain API tools, MCP capabilities, and device tools.
- Workflow: integrate event streams such as Syslog, Kafka, and Webhook.
- Internal Security Product Integration: view the main API integration path.
- Browser Automation and Web Login: view browser and WebCLI scenario boundaries.